Pages

Friday, December 28, 2012

New Year Sangria

As the year comes to an end and we are all getting ready for that awesome New Years party, I have a recipe that is sure to make your party full of happiness.
So dust off that good ol' punch bowl and get to slicin... this recipe is sure to put some spice in the new year *wink* 
 
Ingredients
1 Bottle of Red Wine (Shiraz, Cabernet Sauvignon, Merlot, Zinfandel, Rioja) **
1 Cup of St-Germain **
2 Fresh Peaches washed, pitted, and cut into thin slices*
1 Carton Fresh Stawberries*
1 Carton Fresh Raspberries*
1 Carton Fresh Blackberries*
1 Carton Fresh Blueberries*
Instructions
Place wine and fruit in a pan and bring to a boil.
Lower to a simmer for 2 minutes.
Remove from heat and stir in St-Germain.
Pour into serving pitcher and refrigerate over night.
When ready to serve give a good stir and serve chilled over ice. 
* Merely Suggestions. All ingredients listed in the recipe are estimates. Add or subtract according to your taste. Be creative!
** For non alcoholic Sangria remove wine and St-Germain and replace with bottle of 100% grape juice.
Tip: I used a Sweet Shiraz and chilled in Ball Mason Jars. They make great hostess gifts or presents during the holiday season. Just print a little tag with the ingredients and use a ribbon to tie it around the jar. I like to put fabric scrap circles around the tops on mine. 
Happy New Years from Me, to all of you!! May 2013 be filled with happiness, family and friends. Cheers!

From Megan With Love

Friday, December 21, 2012

Handmade Christmas

Hello Everyone,

It starting to look a lot like Christmas around the office. I have been making yoyos like crazy to decorate. I like to use them for garland, ornaments, and to make mini trees out of. 
I have finished all the dolls I was working on and you can see them all here together. Here are some of the homemade gifts I gave and was given for Christmas. There is a jar of my New Year Sangria. 

What are you making and giving this holiday season?

From Megan With Love

Thursday, December 20, 2012

Making Dolls

Hello Everyone,

I have been making personalized dolls to give this holiday season. Here is a little sneak peak of what I have been working on. I am giving them out today so I can finally share photos. 
Here they all are in the process of sewing.
Here is everything I have been making all packed up and ready to go to work. I love to make decorated gift baskets that really add something special to the gift. 
Here are all the dolls under the tree. 

If you would like to make a doll like this yourself I would be happy to draft you personalized patterns to make your own. 

What are you making for holiday gifts  Do you like to have handmade holidays?

From Megan With Love

Wednesday, December 19, 2012

Ginger Monkey Bread

Hello there friends,

So Christmas is right around the corner and you may be running around like a chicken without a head trying to figure out what to feed your family and friends. Well I am here to save the day!
Try out this recipe for a new twist on this holiday classic. It is "Ginger" Monkey Bread. Get it... (I'm a third generation redhead.)


Ingredients
1 Packet of Active Dry Yeast 
1 Teaspoon Sugar
1/3 Cup Warm Water
2 Sticks Unsalted Butter
1 Cup Milk (I use Whole)
1/4 Cup Molasses
3 1/4 Cup All Purpose Flour
2 Teaspoon Salt
2 Teaspoon Ginger
2 Teaspoon Cinnamon
1/2 Teaspoon Ground Cloves
1/4 Teaspoon Ground Nutmeg
1/4 Cup Flour for Counter
1 Cup of Dark Brown Sugar


Mixing Instructions
In a small bowl mix 1 packet of yeast, 1 teaspoon sugar and 1/3 cup warm water and set aside for 10 minutes until it starts to get foamy
In a small saucepan, melt 2 tablespoons butter, milk, and molasses and set aside
In a bowl (I use a stand mixer) use a fork to combine flour, salt, ginger, cinnamon, cloves and nutmeg
Mix while slowly adding molasses and then yeast mixture
The dough will be sticky and stick to the bottom of bowl, if too wet use flour set aside for counter to one pinch at a time until dough is manageable, dough should look smooth
Knead dough on lightly floured surface and form into ball
Place ball into bowl and place in warm spot to rise until ball doubles in size, can take from 1-2 hours
Butter Bundt pan with 2 tablespoons of softened butter 
Place two shallow pans on the counter and place brown sugar in one and 1 stick melted butter in other
Take small pieces of risen dough in hand and roll into balls about 1 inch round
One at a time dip balls into butter and roll in brown sugar
Place in layers into Bundt pan
Cover pan with plastic wrap and allow to rise 1 more hour in warm place
Preheat over to 350 degrees
The balls will be puffy and come to about an inch under the top of the pan
Bake monkey bread for 30-35 minutes until golden brown
Remove from oven and cool 5 minutes then invert onto plate and allow cake to cool in pan another 5-10 minutes until you can remove from pan


Now pour yourself a nice cup of coffee or hot chocolate and enjoy this delicious treat (guilt-free cuz I said so!)

Merry Christmas!

From Megan With Love

Tuesday, December 18, 2012

The Gizmo Wallet

Hello Everyone,

So while I was on the hunt for the perfect handmade gift for friends I came across a geek wallet that had some of the elements I was looking for but was not yet the perfect gift.  So..  I added some very essential pockets and made it the perfect all-in-one wallet for the "hard to get" person on your list. Its the perfect personal organizer. I am soooo happy with the outcome that I have created this tutorial for you. This wallet was created to hold your phone, MP3 player, credit cards, USB's, money and anything else you need to bring along.


 Materials Needed:
(Tape pages together)
-Fat eighths of desired fabric for body
-Large scraps of desired fabric for pockets
-Pellon Shape Flex Fusible
-Pellon Fleece Fusible


Notions Needed
-5 Buttons
-1 Snap closure
-Elastic


Cutting Directions
-Inside and Outside Panels Cut 2 
Inside Pockets:
-Big Pocket Cut 2
-Phone Pocket Cut 2
-Credit Card Pocket Cut 8
-Mini Pockets Cut 4
Outside Pockets:
-Large Credit Card Pocket Cut 4
-Bill Pocket Cut 2


Interfacing 
-Fuse Pellon Fleece Fusible to Inside and Outside Panels
-Fuse Pellon Shape Flex Fusible to both wrong sides of Big Pocket and Phone Pocket
-Fuse Pellon Shape Flex Fusible to only one wrong side of Bill Pocket and Large Credit Card Pocket


Sewing Instructions
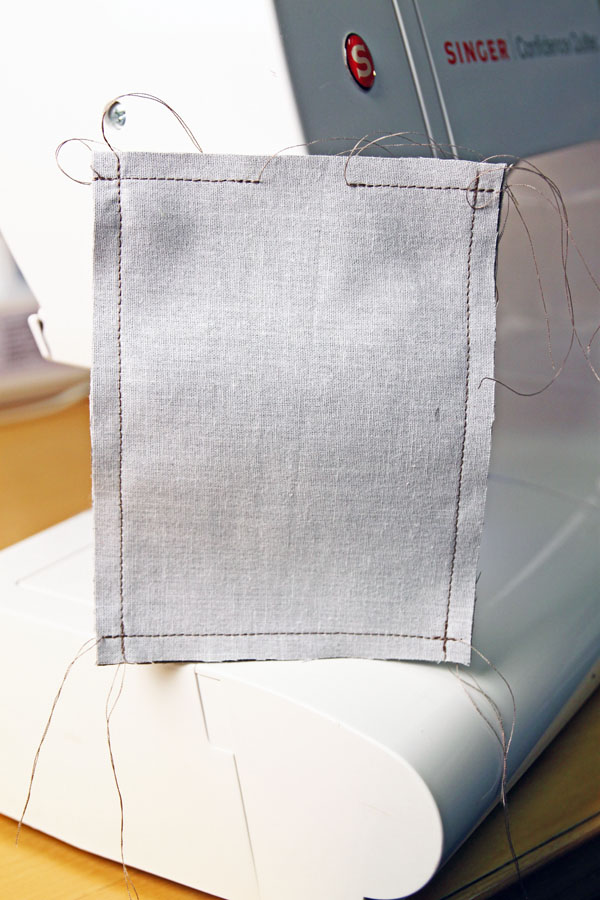
-Place Big Pockets right sides together and begin by sewing bottom edge with a ¼” seam allowance
-Leave a 1” gap in bottom for turning
Sew around three remaining edges


Pockets
-Repeat same steps on phone pocket
-Repeat same steps on bill pocket
-Repeat same steps on large credit card pockets
-Repeat same steps on mini pockets
-Repeat same steps on credit card pockets
-Clip all four corners on each and trim off excess fabric for turning


-Turn all pockets right side out and poke out corners
-Press turned pockets


-Top stich top between 1/8”-1/4” along edge of each pocket depending on desired look
-Make sure to backstitch or hand tie ends to prevent unraveling


-Lay credit card pocket on big pocket
-Measure 3” up from bottom edge and pin first pocket in place


-Sew bottom edge of pocket being sure to pass through both credit card and big pocket
-Align bottom pocket with bottom of big pocket


-Sew bottom edge of pocket being sure to pass through both credit card and big pocket
-Place final two pockets in between sewn pockets and sew bottom edge of pocket one at a time


-All pockets should be spaced evenly making sure to back-stitch or hand tie ends
-Place and pin mini pockets to big pocket
-Stitch bottom edge of mini pockets one at a time
-Stitch sides of mini pockets one at a time making sure to backstitch or hand tie ends

-Place and pin centered phone and big pocket 1 ½” from edge and 1” apart
-Sew down sides of phone pocket one at a time making sure to back-stitch or hand tie ends
-Sew bottom of phone pocket making sure to back-stitch or hand tie ends
-Sew down sides of big pocket one at a time making sure to keep credit card pockets in place back-stitch or hand tie ends
-Sew bottom of big pocket making sure to back-stitch or hand tie ends


-Place and pin first credit card pockets on outside panel 1” down and 1” over from edge
-Place and pin second credit card pocket 1” apart from first pocket
-Place and pin bill pocket centered between credit card pockets and 1” up from bottom edge
-Sew bottom of bill pocket making sure to back-stitch or hand tie ends
-Sew down sides of bill pocket one at a time making sure to back-stitch or hand tie ends


-Prepare buttons and optional notions
-Cut elastic into two 3” strips and one 2” strip
-Mark elastic placement on inside panel


-Use clear tape to hold elastic ends together


-Pin elastic onto inside panel


-Place inside and outside panels right sides together and pin all around
-Sew bottom edge ½” seam allowance leaving a 2” opening for turning
-Make sure to back-stitch over elastic to reinforce seam


-Sew sides of panels with ½” seam allowance
-Sew top edge with 1/2” seam allowance making sure to backstitch over elastic to reinforce seam
-Clip all four corners on each and trim off excess fabric for turning
-Turn entire wallet right side out and press


-Sew buttons on both sides of wallet 1” from edge and ½”-1” down depending on button size


*Snaps inside pockets are options and can be hand sewn
Tip: For the LARGE pocket a snap closure will ensure that your electronics stay in place and for the smaller pocket I suggest using a string/ribbon to tie down your phone so it does not slip out.


This Gizmo wallet is great for just about anyone. It holds credit cards, USB's, your phone and MP3 player all in one spot. No more going through your purse or carrying all these items separately. Everything is safe and snug inside the fleece padding so nothing gets scratched.


Here is a picture of the second one that I made in one of my Plexiglas clutches I make. They will be available soon in my store. They have changeable knobs for the top.

Hope you enjoyed the pattern and if you do make it please share it with me. I love seeing how this works for everyone!
Leave me a comment below letting me know "Who is this gift perfect for?"

Happy Sewing!

From Megan With Love

Friday, December 14, 2012

Holiday Office Party

Hello Everyone,

Tonight was the holiday office party. 
We went to Tatiana Russian Restaurant and Night Club in Hollywood. It was dinner and a show. They even had a live tiger in the second show. I wasn't able to take pictures during the tiger show. It was like being transported to Russia with authentic Russian food and the dinner club atmosphere. We all had a lot of fun and there was dancing after the second show.

What are your holiday dinners like? Have you ever seen a live tiger in a dinner show?

From Megan With Love

Thursday, December 13, 2012

Mini Bundt Brownies

Hello Everyone!

In honor of the holiday season I have a delicious recipe for you to impress with at your next holiday party. Trust me when we say that this recipe will make you the talk of the holiday party scene.
So get those mini bundt pans ready for...


Ingredients
-5 Sticks of Butter
-5 Cups of Sugar
-3 Cups of Unsweetened Dutch Cocoa Powder
-1 Teaspoon Salt
-2 Teaspoon Pure Vanilla Extract
-8 Cold Large Eggs
-2 Cups All-Purpose Flour
Directions
Preheat oven to 350
Double boil butter, sugar, cocoa, and salt in a large glass bowl stir until butter is melted and remove from heat
Stir in vanilla
Stir in one egg at a time; alternate adding flour and eggs
Stir about 50 strokes until batter looks shiny
Bake 25-30 minutes until toothpick comes out almost clean


 Yummmmm....
 Please share with me your favorite holiday recipes.

From Megan With Love

Wednesday, December 12, 2012

Sneak Peak

Hello Everyone,

Here is just a little preview of a work in progress. I am trying out different fabrics and techniques. 
Can you guess what it is going to be? More to come very soon.

From Megan With Love
Friday, December 7, 2012

Jelly Jar Apple Pies

Hello All,


So everyone has been asking me for years for the recipe for my Jelly Jar Apple Pies. They are the perfect size to bring or give as gifts. And in the spirit of the holidays I am finally willing to give it up.  


Believe me when I say that these pies truly are delicious.
Jelly jar apple pies are great for the upcoming holidays as well as a back up for unexpected guests. Just store in the freezer and pop them in the oven when guests arrive and you will all be eating personal homemade pies in no time. Your friends and family will think you're a regular Betty Crocker.
Note: when going from freezer to oven I like to just place the jars in the oven as while I pre-heat. This will help prevent the glass from popping. 
Now for the recipe:


Crust:
-7 1/2 cups of flour
-3 tsp salt
-3 tsp sugar
-6 sticks butter (cold)
-2 1/2 cups ice water
Directions for crust:
-Wisk dry ingredients together
-Add butter cubes and mix by hand adding water S L O W L Y
-By now crust should be crumbly in texture. Place towel over dough and refrigerate for at least 1 hour.


Filling:
-1 dozen apples cut into 1/2 cubes
-4 tbsp butter melted
-2 cups brown sugar
-4 tbsp cornstarch
-4 tsp cinnamon
-dash of salt
-1/4 cup apple cider
Directions:
-Place rack on the center of the oven and pre-heat oven to 375 degrees.
-Mix filling ingredients and simmer over medium heat until filling reduces
-Take dough out of fridge flatten out dough.
-Use lid of jar to cut out circles of dough.
-Press dough into jar along the bottom and sides
-Spoon filling into jars
-Use remaining dough to top pies as desired (leave room to close jar with lids if desired)
-Bake on baking sheet at 375 degrees for 45-50 minutes.
ENJOY!


P.S. If you worry about jars popping in heat you can preheat the jars before filling  by placing them in a pan with hot water but if you are buying jars made for canning purposes you should not have this problem. I like to put the rings back on the tops once the jars have cooled. I think they look nice. When I put the jars in the fridge or freezer I put the disk lids on . 

This recipe is just for my apple version but I also make these in cherry and blueberry. 
I would love to hear about your experience making these or pictures of how they come out. 

From Megan With Love